If you have got a new TP-Link Router then you may not be familiar with the router and know not how to set up the router. Setting up any router is easy including those from TP-Link. You can easily set up your TP-Link Router by following this guide below.
How To Setup a TP-Link Router?
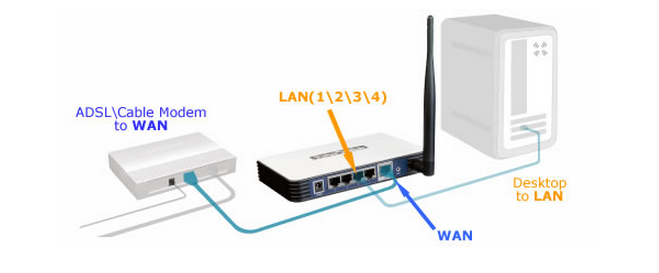
Before you proceed any further, here are a few things that you should do:
- Turn off your router, modem, and PC.
- Connect the modem to the TP-Link using the WAN port on the backside of the TP-Link via an Ethernet Cable.
- Connect the PC to the TP-Link Router using the LAN port via an Ethernet Cable.
- Now, power on your router, modem, and PC.
Now, you should follow these steps to set up your TP-Link Router:
- Open a web browser on your PC.
- Head over to http://tplinkwifi.net.
- A login page will appear, asking you to enter the login username and password.
- Enter the login username and password to proceed further. (The default username and password For TP-Link devices is admin.)
- Once logged in, go to Network > WAN.
- In the WAN Connection Type, select Dynamic IP.
- Click on Save.
- Wait for a few minutes and go to the Status page and scroll down to the WAN section.
- If you see any IP Address there then it means that a connection is established between the router and the modem. If it shows no IP address then move to the next step.
- Go to Network > MAC Clone > Clone MAC Address.
- Now, the router should be showing an IP address on the Status page. (If the problem still persists then reboot your router and after it restarts, a connection would have been established between router and modem.)